Creating and Editing Weblinks
A weblink is a type of resource that simply links to another resource. These are mostly used for the purposes of extending navigation menus without impacting the sitemap.
Note: This entry is about weblinks only (i.e., it does not have information about adding links within content areas.) For information about adding links in content areas see: Special Content Types: Links.
Examples of Usage
- The footer menu is a resource comprised of weblinks.
- The top-level Contact Us menu item in the header menu is a weblink referencing the “Send a Message” item in the submenu.
- Sometimes a client will request that a subpage appear in the top-level of the Header Menu. In these cases, we don’t want to actually move the page in question, because that will impact the sitemap. By adding a weblink in the top-level of the Header Menu, we can reference the item in the submenu without altering the sitemap.
How to Create a New Weblink
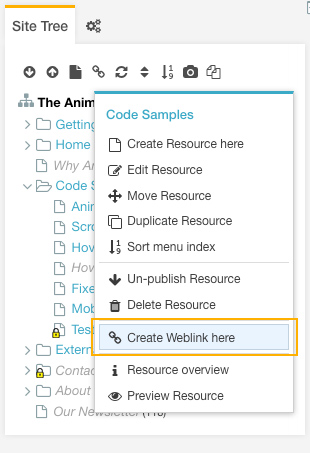
To create a new weblink from within the iMarket CMS Manager, first locate where in the Site Tree this page should live. In most cases, iMarketStaff users will be creating pages that are subpages of top-level items. Find the parent of the page you wish to create, and right-click the page name. Select “Create Weblink here” from the menu that appears.
The page will load in the Main Content Area under the “General” tab. This is where you will enter in all of the information needed to complete the resource. You can unpublish the resource by deselecting the “Published” checkbox under the “Settings Tab.” Be sure to hit the yellow “Save” button once you are finished making edits.
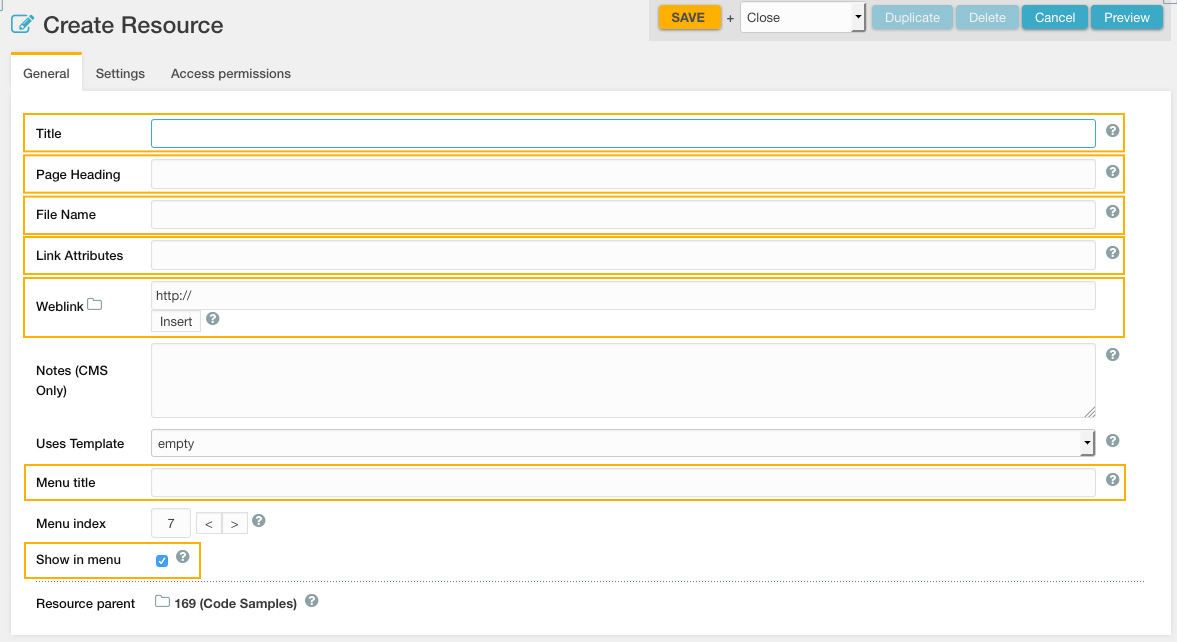
Required Content Areas
- Title: This is title of the resource – that is, the words that will appear in your browser tab. Because this resource is only linking to another page, the title will not be visible on the front end. It is a good practice to fill in this field with the same information from the page you are linking to, for clarity (to other CMS users)
- Page Heading: Again, because this resource is only linking to another page, this field will not be visible on the front end. It is a good practice to fill in this field with the same information from the page you are linking to, for clarity (to other CMS users).
- File Name: This is the document’s filename – i.e., the name under which it will be stored in the website’s database. Every filename must be unique. Visitors to your site will see the File Name at the very end of the web address. For example, if you enter “contact-us” in this field, the URL of the document you create will be http://www.yourdomain.com/contact-us. For this reason, so you should use real English words in your file name, not numbers or abbreviations that only you can figure out. The File Name cannot have any spaces or capital letters, and separate words should be divided by hyphens, not underscores (because search engines don’t like underscores). Filenames are important for search engine placement and impact the sitemap.
- Link Attributes: This field is only required if you are linking to an external website.
- Weblink: This is the resource the weblink will link to. In most cases, this will be an internal page (i.e., another page on the website). All internal links should be built using the ID of the resource, rather than by inputting the URL. For external links, you should enter in the full URL (ie: http://google.com).
- Menu Title: This is the text that will be used in the navigation to link to the page. If possible, the Menu Text should match the Page Title, although sometimes you will have to shorten it to make the Menu Text fit neatly in the navigation menu.
- Menu Index: Menu Index is used to specify the order in which pages appear in your site’s navigation. The lower the number entered in this field, the earlier the page will appear in the navigation. We recommend using multiples of 10 for this field to make it easier to re-order pages.
- Show in Menu: If this box is checked, it means that a link to the page will appear in the navigation menu (and Sitemap page). If you uncheck the checkbox, the page will not appear.
Linking to External Websites
When linking an external website, we want to ensure the link always opens in a new tab. Also, we want to make sure visitors are aware they will be directed to a new tab, by displaying a hover state to that effect. The iMarket CMS has a built in a tool that accomplishes both of these tasks:
- Add
class="external"to the Link Attributes field whenever linking to an external website.
Linking to Internal Webpages
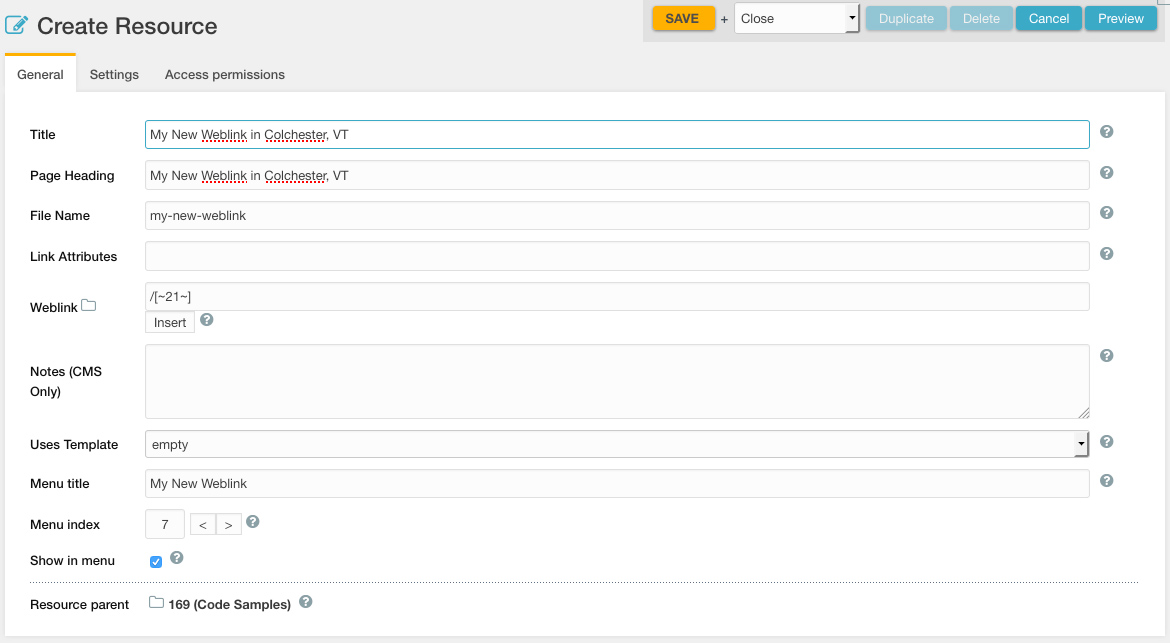
Links to internal pages on the website should always be built using the ID of the resource (rather than typing or pasting in the URL). That way, if the sitemap is altered at a later date, the internal link will still function properly. Internal links should always look like this (with “ID” replaced with the ID # of the resource you are linking to):
- /[~ID~]
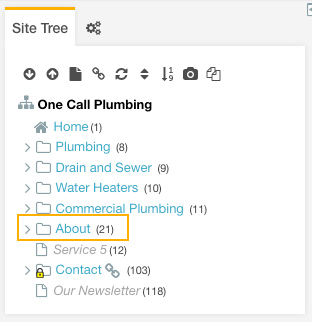
The ID of the resource is displayed in parentheses next to the title in the Site Tree.
Example of a Completed Weblink
Best Practices
- Links to internal pages on the website should always be built using the ID of the resource (rather than typing or pasting in the URL).
If the sitemap is altered at a later date, the internal link will still function properly because the ID of the resource will remain the same. - Add
class="external"to the Link Attributes field whenever linking to an external website.
This will ensure the external link opens in a new tab.
- Non-Development users should not publish new top-level weblinks without opening a ticket to Development first.
Before creating any weblinks, first determine if this is a top-level page of the Header Menu. If this is the case, you may create the weblink but must leave it unpublished. Open a ticket to Development requesting that they revise the Header Menu to account for the additional item, and that they publish the weblink once it’s complete. Otherwise, adding another item to the top-level will likely result in a broken Header Menu, as illustrated below:

Last updated: